Unreal Engine 5 C++ Complete Guide
Getting started with Unreal Engine C++ can be a bit of a struggle. The resources online have no clear path to follow or fail to explain the Unrealisms you’ll encounter. In this article, I’ll attempt to give you an overview of many unique aspects of Unreal’s C++ (TObjectPtr, Delegates, etc.) and briefly go over some of the native C++ features (pointers, macros, interfaces) and how they are used in the context of Unreal Engine. It’s a compilation of the many different concepts that you will face when working in C++ and Unreal Engine on a daily basis.
Throughout the article, I will be using code snippets from “Project Orion” a Co-op Action Roguelike Sample Game. You can browse the source code on GitHub.
Note: This guide should help you understand the specifics of C++ within Unreal Engine. To have a starting point and reference guide while diving into the hands-on tutorials that demonstrate the practical use of C++ for your game. This guide is extensive, don’t forget to bookmark it!
C++ vs. Blueprints
Before we begin, a quick word on C++ vs. Blueprint. It’s the most common discussion in the community. I love C++ and Blueprint and heavily use both. Building a solid foundation in C++ (your framework) and creating small game-specific ‘scripts’ on top using Blueprint is an extremely powerful combination.
While Blueprint in Unreal Engine is a powerful scripting tool for anyone looking to build games, learning C++ unlocks the full potential of the engine. Not every feature is exposed to Blueprint, for certain things you still need C++. Certain game features may just be easier to build and maintain in C++ in the first place. Not to mention the potential performance gain of using code over Blueprint for the core systems of your game.
“In the early days, I went deep into C++ and tried to do pretty much everything with it, disregarding the power of Blueprint. In hindsight, this made my code more rigid than it needed to be and removed some flexibility for others to make adjustments without C++ knowledge. I later focused more on a healthy balance to great effect.”
Building the foundational systems (ability systems, inventories, world interaction, etc.) in C++ and expanding these systems in Blueprint to tie it all together to actual gameplay. This is something we dive into during my Unreal Engine C++ course as well, where we build the game framework and ability system to enable small but powerful Blueprints to be created on top to define specific abilities, items, interactions, etc.
Alex Forsythe has a great video explaining how C++ and Blueprint fit together and why you should use both instead of evangelizing one and dismissing the other.
C++ Syntax & Symbols
While looking at C++ tutorials, you may be wondering about a few common symbols. I will explain their meaning and use cases without going too deep into their technical details. I’ll explain how they are most commonly used within Unreal Engine gameplay programming, not C++ programming in general.
Asterisk ‘*’ (Pointers)
Commonly known as “pointers”, they may sound scarier than they actually are within Unreal Engine, as most memory management is being taken care of while we’re dealing with gameplay programming. Most commonly used to access objects like Actors in your level and references to assets in your content folders such as sound effects or particle systems.
Pointers to Objects
The first way you’ll be using pointers is to access and track instances of your objects. In order to access your player, you’ll keep a pointer to the player class. For example, AMyCharacter* MyPlayer;
// Get pointer to player controller, points to somewhere in memory containing all data about the object.
APlayerController* PC = GetWorld()->GetPlayerController();
After running this code, the “PC” variable is now pointing to the same place in memory as the player controller we retrieved from World. We didn’t duplicate anything or create anything new, we just looked up where to find the object we need, and can now use it to do stuff for us such as calling functions on it or accessing its variables.
// Example function that tries to get the Actor underneath the player crosshair if there is any
AActor* FocusedActor = GetFocusedInteractionActor();
if (FocusedActor != nullptr)
{
  FocusedActor->Interact();
}
// alternative shorthand to check if pointer is valid is simply
if (FocusedActor)
{
  FocusedActor->Interact();
}
Defensive Programming
It’s important to check if pointers are not “null” (also written as nullptr in code, meaning not pointing to anything in memory) before attempting to call functions or change its variables, or the engine will crash when executing that piece of code. So you will use the above if-statement often.
Perhaps even more important than knowing when to check for nullptr, is when NOT to include nullptr checks.
You should generally only check for nullptr if it’s likely and expected that a pointer is null and continue execution of the game regardless. In the above code example, FocusedActor is going to be nullptr any time there is no interactable Actor under the player’s crosshair.
Now imagine in the example below we return a nullptr from GetPlayerController() and (quietly) skip the if-statement where we would otherwise add an item to inventory. You will scratch your head while playing wondering why you did not receive this item. Having no player controller during gameplay is unexpected and not a valid state of the game, we should not allow to (silently) continue. We either crash the game entirely or at the very least include an Assert to be immediately informed about this corrupt/broken state of the code.
APlayerController* PC = GetWorld()->GetPlayerController();
if (PC)
{
    PC->AddToInventory(NewItem);
}
For more info on this concept, I recommend Ari Arnbjörnsson’s talk (at 22:48).
When creating components to be used in your Actor classes we use similar syntax. In the header file, we define a pointer to a component, this will be a nullptr until we assign it an instance of the component. Here is an example from the header of RogueCharacter.h where we define a CameraComponent. (See ObjectPtr<T> further down in this article which has replaced raw pointers in headers for Unreal Engine 5)
UPROPERTY(VisibleAnywhere)
UCameraComponent* CameraComp;
Now in the RogueCharacter.cpp constructor (called during spawning/instantiation of the Character class), we create an instance of the CameraComponent.
// This function is only used within constructors to create new instances of our components. Outside of the constructor we use NewObject<T>();
CameraComp = CreateDefaultSubobject<UCameraComponent>("CameraComp");
// We can now safely call functions on the component
CameraComp->SetupAttachment(SpringArmComp);
We have now created and assigned an instance to the CameraComp variable.
If you want to create a new object outside the constructor, you instead use NewObject<T>(), and for creating and spawning Actors use GetWorld()->SpawnActor<T>() where T is the class you want to spawn such as ARogueCharacter.
TObjectPtr<T>
In Unreal Engine 5 a new concept was introduced called TObjectPtr<T> to replace raw pointers (eg. UCameraComponent*) in header files with UProperties. This benefits the new systems such as virtualized assets among other things which is why it’s the new standard moving forward. The example above will now look as follows.
UPROPERTY(VisibleAnywhere)
TObjectPtr<UCameraComponent> CameraComp;
These benefits are for the editor only and in shipped builds it will function identically to raw pointers. You may continue to use raw pointers, but it’s advised by Epic to move over to using TObjectPtr whenever possible.
TObjectPtr<T> is only for the member properties in the headers, your C++ code in .cpp files continues to use raw pointers as there is no benefit to using TObjectPtr<T> in functions and short-lived scope.
Pointers to Assets
The other common way to use pointers is to reference assets. These don’t represent instances in your world/level, but instead point to loaded content in memory such as textures, sound effects, meshes, etc. (it’s still pointing to an object, which in this case is the class representing a piece of content or an “in-memory representation of an asset on disk”).
Much like the previous example of the Camera Component, in Unreal Engine 5 you will use TObjectPtr<UNiagaraSystem> instead of UNiagaraSystem* (raw pointer) to reference assets. Raw pointers continue to work and shipped builds will effectively use raw pointers again automatically.
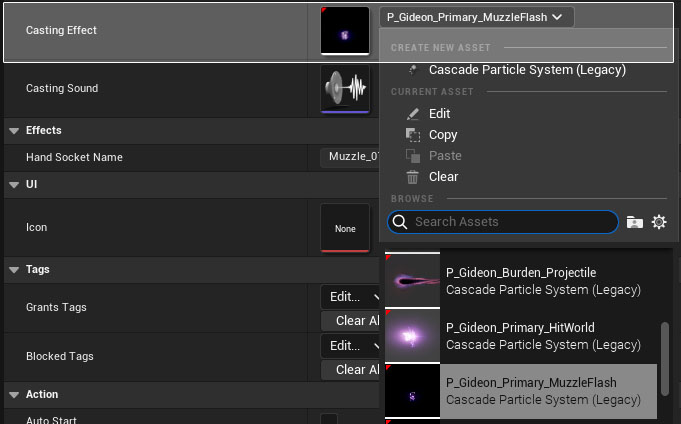
We can take a projectile attack ability as an example that references a particle system. The header defines the NiagaraSystem pointer:
/* Particle System played during attack animation */
UPROPERTY(EditAnywhere, Category = "Attack")
TObjectPtr<UNiagaraSystem> CastingEffect;
// Can point to an asset in our content folder, will be assigned something via the editor, not in the constructor as we did with components
Note that this pointer is going to be empty (nullptr) unless we assigned it to a specific Niagara particle system via the Unreal Editor. That’s why we add UPROPERTY(EditAnywhere) to expose the variable to be assigned with an asset.
Now in the class file of the projectile attack (line 25), we can use this asset pointer to spawn the specified particle system:
UNiagaraFunctionLibrary::SpawnSystemAttached(CastingEffect, Character->GetMesh(), HandSocketName, FVector::ZeroVector, FRotator::ZeroRotator, EAttachLocation::SnapToTarget, true);
Note: In this example, we didn’t check whether CastingEffect is a nullptr before attempting to use it, the SpawnEmitterAttached function already does that and won’t crash if it wasn’t assigned a valid particle system.
Period ‘.’ and Arrow operator ‘->’ (Accessing Variables/Functions)
Used to access Variables or call Functions of objects. You can type in the period ‘.’ and it automatically converts to ‘->’ in source editors like Visual Studio when used on a pointer. While they are similar in use, the ‘.’ is used on Value-types such as structs (like FVector, FRotator, and FHitResult) and ‘->’ is generally used on classes that you access using Pointers, like Actor, GameMode, NiagaraSystem, etc.
Examples:
// pointer to Actor class called AMyCar ('A' prefix explained later)
AMyCar* MyCar = SpawnActor<AMyCar>(...);
// Calling function on class instance (pointer)
MyCar->StartEngine();
// Getting variable from class instance (pointer)
float Variable = MyCar->EngineTorque;

// struct containing line trace info
FHitResult HitResult;
// FHitResult is a struct, meaning we use it as a value type and not a class instance.
FVector HitLocation = HitResult.ImpactLocation;
Note: You can use pointers with value types like struct, float, etc. You often don’t use pointers on these types in game code, hence why I used this as the differentiator.
Double Colon ‘::’
Used to access ‘static functions’ (and variables) on classes. A good example is UGameplayStatics, which only consists of static functions, eg. to spawn particles and sounds. Generally, you’ll have very few static variables, so its main use is for easy-to-access functions. Static functions cannot be called on a class instance and only on the class type itself (see below).
Example of calling a static function on a class:
UGameplayStatics::PlaySoundAtLocation(this, SoundOnStagger, GetActorLocation());
Since these functions are static, they don’t belong to a specific ‘UWorld’. UWorld is generally the level/world you play in, but within the editor, it could be many other things (the static mesh editor has its own UWorld for example). Many things need UWorld, and so you will often see the first parameter of static functions look like this:
static void PlaySoundAtLocation(const UObject* WorldContextObject, USoundBase* Sound, FVector Location, ...)
UObject* WorldContextObject can be anything that lives in the relevant world, such as the character that calls this function. And so most of the time you can pass ‘this’ keyword as the first parameter. The const keyword in front of the parameter means you cannot make changes to that WorldContextObject within the context of the function.
You will also see a double colon when declaring the body of a function itself (regardless of it being static or not)
void ARogueAICharacter::Stagger(UAnimMontage* AnimMontage, FName SectionName /* = NAME_None*/)
{
  // ... code in the function (this is in the .cpp file)
}
Ampersand ‘&’ (References & Address operator)
Also known as the reference symbol and address operator. I find that I don’t use this as often as the others within gameplay code specifically, but important to know how to use it nonetheless as you will need it to pass around functions when setting timers or binding input.
Pass by Reference
A common concept is to ‘pass by reference’ a value type like a struct, or a big Array filled with thousands of objects. If you were to pass these variables into a function, without the reference symbol, two things happen:
- The code creates a copy of the parameter value, in the case of a big array this can be costly and unnecessary.
- More importantly, because a copy is created, you can’t simply change that variable and have it change in the ‘original’ variable too, you basically cloned it and left the original variable unchanged. If you want to change the original variable inside the function, you need to pass it in as a reference (this is specific to value types like
float,bool, structs such asFVector, etc.) Let me give you an example.
void ChangeTime(float TimeToUpdate)
{
    // add 1 second to the total time
    TimeToUpdate += 1.0f;
}
Now calling this function as seen in the example below will print out 0.0f at the end since the original TimeVar was never actually changed.
float TimeVar = 0.0f;

ChangeTime(TimeVar);

print(TimeVar); // This would print out: 0.0f  - because we cloned the original variable, and didn't pass in the original into the function. So any change made to that value inside the function is lost.
Now we change the function to:
void ChangeTime(float& TimeToUpdate)
{
    // add 1 second to the total time
    TimeToUpdate += 1.0f;
}
Now if we use the same code as before, we get a different result: The printed value would now be 1.0f.
float TimeVar = 0.0f;

ChangeTime(TimeVar);

print(TimeVar); // This would print out: 1.0f - because we passed in the original value by reference, let the function add 1.0f and so it updated TimeVar instead of a copy.
Address Operator
Another important use is the address operator, which even lets us pass functions as parameters into other functions. This is very useful for binding user input and setting timers to trigger specific functions.
The BindAxis() function in the example below needs to know which function to call when the mapped input is triggered. We pass in the function and use the address operator (&).
// Called to bind functionality to input
void ARogueCharacter::SetupPlayerInputComponent(UInputComponent* PlayerInputComponent)
{
  Super::SetupPlayerInputComponent(PlayerInputComponent);

  PlayerInputComponent->BindAxis("MoveForward", this, &ARogueCharacter::MoveForward);
  PlayerInputComponent->BindAxis("MoveRight", this, &ARogueCharacter::MoveRight);
}
Another common use case is to pass a function into timers. The third parameter is again the function we pass in to be called when the timer elapses.
// Activate the fuze to explode the bomb after several seconds
GetWorldTimerManager().SetTimer(FuzeTimerHandle, this, &ARogueBombActor::Explode, MaxFuzeTime, false);
Public, Protected, Private
These keywords can mark variables and functions in the header file to give or limit ‘access rights’ for other classes.
private:can only be accessed inside that class and not other classes or even derived classes.protected:it cannot be accessed from other classes but can be accessed in the derived class.public:other classes have open access to the variable or function.
Generally, you only want to expose what can be safely called/changed from the outside (other classes). You don’t want to make your variables public if they should trigger an event whenever they are changed. Instead, you mark the variable protected or even private and create a public function instead which sets the variable and calls the desired event.
private:
  int32 MyInt;

public:
  void SetMyInt(int32 NewInt);
Forward Declaring Classes
Forward declaring C++ classes is done in header files and is done instead of including the full files via #include. The purpose of forward declaring is to reduce compile times and dependencies between classes compared to including the .h file.
Let’s say we wish to use UNiagaraSystem class in another header named MyCharacter.h. The header file (and compiler) doesn’t need to know everything about UNiagaraSystem, just that the word is used as a class.
#include "CoreMinimal.h"
//#include "NiagaraSystem.h" // << We don't need to include the entire file

class UNiagaraSystem; // << We can instead just 'forward declare' the type.

UCLASS()
class ACTIONROGUELIKE_API ARogueCharacter : public ACharacter
{
  GENERATED_BODY()

  TObjectPtr<UNiagaraSystem> CastingEffect;
// ...
The class keyword provides the minimum the compiler requires to understand that word is in fact a class. If we included the .h file for the class instead this could negatively impact our compile times. Any changes to the included header (eg. including your MyCharacter.h elsewhere in your code) will cause the classes which include said header to re-compile too.
Here is the character class example that forward declares all the Components used in the header instead of including their .h files.
Forward Declaration is mentioned in Epic’s Coding Standards as well. “If you can use forward declarations instead of including a header, do so.”
Casting (Cast<T>)
Casting to specific classes is something you’ll use all the time. Casting pointers in Unreal Engine is a bit different from ‘raw C++’ in that it’s safe to cast to types that might not be valid, your code won’t crash and instead just returns a nullptr (null pointer).
As an example, you might want to Cast your APawn* to your own character class (eg. ARogueCharacter) as casting is required to access the variables and functions declared in that specific class.
APawn* MyPawn = GetPawn();
ARogueCharacter* MyCharacter = Cast<ARogueCharacter>(MyPawn);
if (MyCharacter) // verify the cast succeeded before calling functions
{
  // Respawn() is defined in ARogueCharacter, and doesn't exist in the base class APawn. Therefore we must first Cast to the appropriate class.
  MyCharacter->Respawn();
}
It’s not always preferable to cast to specific classes, especially in Blueprint as this can have a negative impact on how much data needs to be loaded into memory. Any time you add a Cast to a certain Blueprint class on your EventGraph that object will be loaded into memory immediately (not when the Cast-node is hit at runtime, but as soon as the Blueprint itself gets loaded/created), causing a cascade of loaded objects. Especially when Blueprints reference a lot of assets (meshes, particles, textures) this has a large impact on your project’s (load/memory) performance.
Blueprint Example: BlueprintA has a cast-to node in its EventGraph that casts to BlueprintB. Now as soon as BlueprintA is used/loaded in-game, BlueprintB is loaded at the same time. They will now both remain in memory even if you don’t actually have any instances of BlueprintB in your Level.
This often becomes a problem when developers put all their code in the Character Blueprint. Everything you Cast to on its EventGraph (or functions) will be loaded into memory including all their textures, models, and particles.
Since all C++ classes will be loaded into memory at startup regardless, the main reason to cast to base classes is compilation time. It will avoid having to recompile classes that reference (#include) your class headers whenever you make a change. This can have a cascading effect of recompiling classes that depend on each other.
C++ Example: You only cast to ARogueCharacter if your function or variable required is first declared in that class. If you instead need something already declared in APawn, you should simply cast to APawn instead.
One way to reduce class dependencies is through interfaces…so that’s what we will talk about next.
Interfaces
Interfaces are a great way to add functions to multiple classes without specifying any actual functionality yet (implementation). Your player might be able to interact with a large variety of different Actors in the level, each with a different reaction/implementation. A lever might animate, a door could open or a key gets picked up and added to the inventory.
Interfaces in Unreal are a bit different from normal programming interfaces in that in Unreal Engine you are not required to implement the function, it’s optional.
An alternative to interfaces is to create a single base class (as mentioned earlier) that contains a Interact() function that child classes can override to implement their own behavior. Having a single base class is not always ideal or even possible depending on your class hierarchy, and that’s where interfaces might solve your problem.
Interfaces are a little odd at first in C++ as they require two classes with different prefix letters. They are both used for different reasons but first, let’s look at the header.
// This class does not need to be modified.
UINTERFACE(MinimalAPI)
class USGameplayInterface : public UInterface
{
  GENERATED_BODY()
};

/**
 *
 */
class ACTIONROGUELIKE_API IRogueGameplayInterface
{
  GENERATED_BODY()

  // Add interface functions to this class. This is the class that will be inherited to implement this interface.
public:

  UFUNCTION(BlueprintCallable, BlueprintNativeEvent)
  void Interact(APawn* InstigatorPawn);
};
With the interface class defined you can ‘inherit’ from it in other C++ classes and implement actual behavior. For this, you use the “I” prefixed class name. Next to public AActor we add , public IRogueGameplayInterface to specify we want to inherit the functions from the interface.
UCLASS()
class ACTIONROGUELIKE_API ARogueItemChest : public AActor, public IRogueGameplayInterface // 'inherit' from interface
{
  GENERATED_BODY()

  // declared as _Implementation since we defined the function in interface as BlueprintNativeEvent
  void Interact_Implementation(APawn* InstigatorPawn);
}
BlueprintNativeEvent allows C++ to provide a base implementation while Blueprint derived classes can choose to override or extend this function. In C++ the function implementation will have an \_Implementation suffix added. This is from code generated by Unreal.
In order to check whether a specific class implements (inherits from) the interface you can use Implements<T>(). For this, you use the “U” prefixed class name.
if (MyActor->Implements<URogueGameplayInterface>())
{
}
Calling interface functions is again unconventional. The signature looks as follows: IMyInterface::Execute_YourFunctionName(ObjectToCallOn, Params); This is another case where you use the “I” prefixed class.
IRogueGameplayInterface::Execute_Interact(MyActor, MyParam1);
Important: There are other ways to call this function, such as casting your Actor to the interface type and calling the function directly. However, this fails entirely when interfaces are added/inherited to your class in Blueprint instead of in C++, so it’s recommended to just avoid that altogether.
However, if you want to share functionality between Actors but don’t want to use a base class then you could use an ActorComponent.
Steve Streeting has more details on using Interfaces which I recommend checking out. There is a code example in the Action Roguelike project as well using RogueGameplayInterface used by InteractionComponent to call Interact() on any Actor implementing the interface.
Delegates
Delegates (also known as Events) allow code to call one or multiple bound functions when triggered. Sometimes you’ll see this referred to as Callbacks. For example, It can be incredibly helpful to bind/listen to a delegate and be notified when a value (such as character health) changes. This can be a lot more efficient than polling whether something changed every frame using Tick().
There are several types of these delegates/events. I’ll explain the most commonly used ones for game code using practical examples rather than low-level language details. I’m also not covering all the different ways of binding (only focusing on the more practical ways instead) or niche use cases, you can find more details on the official documentation for those.
Declaring and Using Delegates
You start by declaring the delegate with a MACRO. There are variants available to allow passing in parameters, these have the following suffix. _OneParam, _TwoParams, _ThreeParams, etc. You define these in the header file, ideally, above the class where you want to call them.
// These macros will sit at the top of your header files.
DECLARE_DYNAMIC_MULTICAST_DELEGATE()
DECLARE_DYNAMIC_MULTICAST_DELEGATE_TwoParams()
We’ll start by showing the process of declaring and using delegates in detail with a commonly used type, and then explain the other types more briefly as they share the same concepts.
Multicast Dynamic
One of the most used types of delegate in your game code as they can be exposed to Blueprint to bind and receive callbacks.
Note: Dynamic Multicast Delegates are also known as Event Dispatchers in Blueprint.
The macros take at least one parameter, which defines their name. eg. FOnAttributeChanged could be a name we use as our Delegate to execute whenever an attribute such as Health changes.
DECLARE_DYNAMIC_MULTICAST_DELEGATE(<typename>)
DECLARE_DYNAMIC_MULTICAST_DELEGATE_TwoParams(<typename>, <paramtype1>, <paramvarname1>, <paramtype2>,<paramvarname2>)
Here is one example of a delegate with four parameters to notify code about a change to an attribute. The type and variable names are split by commas, unlike normal functions.
DECLARE_DYNAMIC_MULTICAST_DELEGATE_FourParams(FOnAttributeChanged, AActor, InstigatorActor, URogueAttributeComponent, OwningComp, float, NewValue, float, Delta);
You now add the delegate in your class header, which may look as follows:
UPROPERTY(BlueprintAssignable, Category = "Attributes")
FOnAttributeChanged OnHealthChanged;
You may have noticed BlueprintAssignable, this is a powerful feature of the Dynamic delegates which can be exposed to Blueprint and used on the EventGraph.
Executing Delegates
Finally, to actually trigger the callback we call OnHealthChanged_.Broadcast()_ and pass in the expected parameters.
OnHealthChanged.Broadcast(InstigatorActor, this, NewHealth, Delta);
Binding to Delegates
Binding in C++
You should *never* bind your delegates in the constructor and choose either AActor::PostInitializeComponents() or BeginPlay() to avoid issues where delegates get serialized into the Blueprint and will still be called even when you later remove the delegate binding in C++.
Since delegates are weakly referenced you often don’t need to unbind delegates when destroying objects/actors unless you want to manually stop listening/reacting to specific events.
You can bind to a delegate calling .AddDynamic(). The first parameter takes a UObject for which we can pass this. The second parameter types the address of the function (YourClass::YourFunction) which is why we pass the function with the ampersand (&) symbol which is the address operator.
void ARogueAICharacter::PostInitializeComponents()
{
  Super::PostInitializeComponents();

  AttributeComp->OnHealthChanged.AddDynamic(this, &ARogueAICharacter::OnHealthChanged);
}
The above OnHealthChanged function is declared with UFUNCTION() in the header.
UFUNCTION()
void OnHealthChanged(AActor* InstigatorActor, URogueAttributeComponent* OwningComp, float NewHealth, float Delta);
Binding in Blueprint
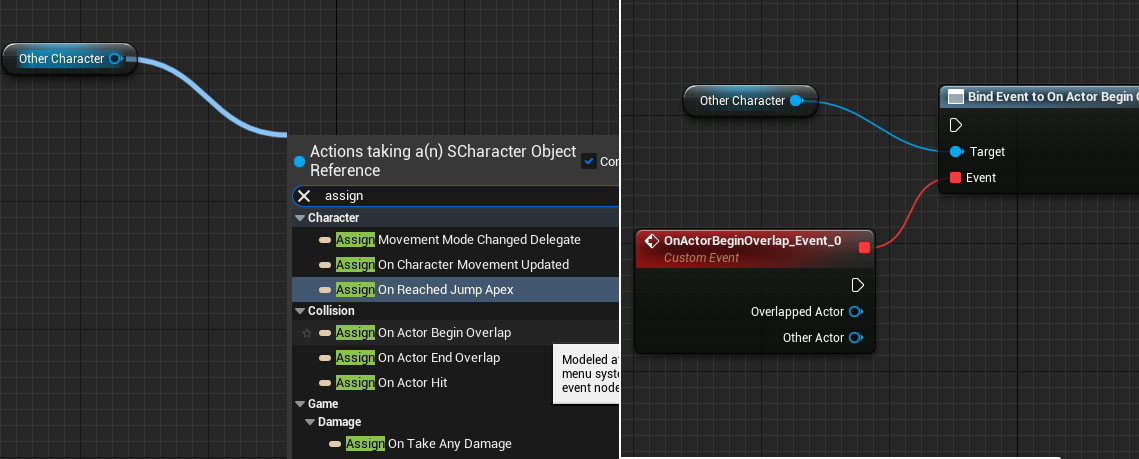
You can easily bind your dynamic delegates in Blueprint. When implemented on an ActorComponent as in the example below you can select the Component in the outliner and click the “+” symbol in its details panel. This creates the Delegate on the EventGraph and is already bound for us.

You can also manually bind the delegates via the EventGraph (eg. binding to another Actor’s delegates).
Note: Dynamic delegates are less performant than non-dynamic (seen below) variants. It’s therefore advisable to only use this type when you want to expose it to Blueprint.
C++ Delegates
Macro: DECLARE_DELEGATE, DECLARE_DELEGATE_OneParam
When used only in C++ we can define delegates with an unspecified amount of parameters. In the following example, we’ll use a more complex use case which is asynchronously loading game assets.
The StreamableManager of Unreal defines a FStreamableDelegate.
DECLARE_DELEGATE(FStreamableDelegate);
This doesn’t specify any parameters yet and lets us define what we wish to pass along in our own game code.
The following is taken from RogueGameModeBase in the ActionRoguelike project (link to code). We asynchronously load the data of an enemy Blueprint to spawn them once the load has finished.
if (UAssetManager* Manager = UAssetManager::GetIfValid())
{
  // Primary Id is part of AssetManager, we grab one from a DataTable
  FPrimaryAssetId MonsterId = SelectedMonsterRow->MonsterId;

  TArray<FName> Bundles;

  // A very different syntax, we create a delegate via CreateUObject and pass in the parameters we want to use once loading has completed several frames or seconds later. (In this case the MonsterId is the asset we are loading via LoadPrimaryAsset and Locations[0] is the desired spawn location once loaded)
  FStreamableDelegate Delegate = FStreamableDelegate::CreateUObject(this, &ARogueGameModeBase::OnMonsterLoaded, MonsterId, Locations[0]);

  // Requests the load in Asset Manager on the MonsterId (first param) and passes in the Delegate we just created
  Manager->LoadPrimaryAsset(MonsterId, Bundles, Delegate);
}
In the example above we create a new Delegate variable and fill it with variables, in this case MonsterId and the first vector location from an array (Locations[0]). Once the LoadPrimaryAsset function from Unreal has finished, it will call the delegate OnMonsterLoaded with the provided parameters we passed into the CreateUObject function previously.
void ARogueGameModeBase::OnMonsterLoaded(FPrimaryAssetId LoadedId, FVector SpawnLocation)
Another example of using delegates/callbacks is with Timers. We don’t need to specify our own delegate first and can directly pass in the function address so long as it has no parameters. It’s possible to use timers with parameters as well. To learn more you can check out my blog post on Using C++ Timers.
There is a lot more to talk about, but this should provide a core understanding from which to build. There are many more variants to the macros and different ways to bind…which could be a whole article on its own.
To read more about delegates I recommend BenUI’s Intro to Delegates and Advanced Delegates in C++.
Public/Private Folders
The Unreal Engine class wizard gives you the option to add new classes in the project root to split the header and code files into /public/YourClass.h and /private/YourClass.cpp folders.
Public and private folders define which files are available to use in other modules. Generally, your header files (YourClass.h) are placed in the Public folder so other modules can gain access and the code files (YourClass.cpp) are in the Private folder. Headers that are not meant to be used directly by other modules can go into the Private folder as well.
Your primary game module doesn’t need this public/private structure if you don’t intend to have other Modules depend on it.
I recommend checking out Ari’s talk on modules for more information on Modules and how to use them.
Class Prefixes (F, A, U, E, G, T, …)
Classes in Unreal have a prefix, for example, the class ‘Actor’ is named ‘AActor’ when seen in C++. These are helpful in telling you more about the type of object. Here are a few important examples.
A. Actor derived classes (including Actor itself) have A as prefix, eg. APawn, AGameMode, AYourActorClass
U. UObject derived classes, including UBlueprintFunctionLibrary, UActorComponent and UGameplayStatics. Yes, AActor derives from UObject, but it overrides it with its own A prefix.
F. Structs, like FHitResult, FVector, FRotator, and your own structs should start with F.
E. The convention for enum types. (EEnvQueryStatus, EConstraintType, …)
G. “globals” for example, GEngine->AddOnscreenDebugMessage() where GEngine is global and can be accessed anywhere. Not very common in your use within gameplay programming itself though.
T. Template classes, like TSubclassOf<T> (class derived from T, which can be almost anything), TArray<T> (lists), TMap<T> (dictionaries) etc. classes that can accept multiple classes. Examples:
// A list of strings.
TArray<FString> MyStrings;

// A list of actors
TArray<AActor*> MyActors;

// Can be assigned with a CLASS (not an instance of an actor) that is either a GameMode class or derived from GameMode.
TSubclassOf<AGameMode> SubclassOfActor;
Mike Fricker (Lead Technical Director) explained the origins of “F” Prefix:
“The ‘F’ prefix actually stands for “Float” (as in Floating Point.)”
“Tim Sweeney wrote the original “FVector” class along with many of the original math classes, and the ‘F’ prefix was useful to distinguish from math constructs that would support either integers or doubles, even before such classes were written. Much of the engine code dealt with floating-point values, so the pattern spread quickly to other new engine classes at the time, then eventually became standard everywhere.”
“This was in the mid-nineties sometime. Even though most of Unreal Engine has been rewritten a few times over since then, some of the original math classes still resemble their Unreal 1 counterparts, and certain idioms remain part of Epic’s coding standard today.”
Project Prefixes
Projects in Unreal should use their own (unique) prefix to signify their origin. For example, all classes in Unreal Tournament use “UT” (AUTActor, UUTAbility), and Fortnite uses “Fort” prefix (AFortActor, UFortAbility, etc).
In the many code examples in this guide, I used “Rogue” as the prefix. The code examples in this guide are taken from the Action Roguelike project.
Common Engine Types
Besides the standard types like float, int32, bool, which I won’t cover as there is nothing too special to them within Unreal Engine - Unreal has built-in classes to handle very common logic that you will use a lot throughout your programming. Here are a few of the most commonly seen types from Unreal that you will use. Luckily the official documentation has some information on these types, so I will be referring to that a lot.
Ints are special in that you are not supposed to use “int” in serialized UProperties as the size of int can change per platform. That’s why Unreal uses its own sized int16, int32, uint16, etc. - Source
FString, FName, FText
There are three types of ‘strings’ in Unreal Engine that are used for distinctly different things. It’s important to select the right type for the job or you’ll suffer later. The most common problem is using FString for UI text instead of FText, this will be a huge headache later if you plan to do any sort of localization.
FStringThe base representation for strings in Unreal Engine. Used often when debugging and logging information or passing raw string information between systems (such as REST APIs). Can be easily manipulated.FNameEssentially hashed strings that allow much faster comparisons between two FNames. (they don’t change once created) and are used often for look-ups such as socket names on a Skeletal Mesh and as GameplayTags.FTextFront-end text to display to the user. Can be localized into many languages. All your front-facing text should always beFTextfor this reason.
Here is a piece of Documentation on String handling including how to convert between the different types.
FVector, FRotator, FTransform (FQuat)
Used to specify the location, rotation, and scale of things in the World. A line trace for example needs two FVectors (Locations) to specify the start and end of the line. Every Actor has an FTransform that contains Location, Rotation, and Scale to give it a place in the world.
FVector3-axis as XYZ where Z is up. specifies either a Location or a direction much like common Vector-math.FRotator3 params Pitch, Yaw and Roll to give it a rotation value.FTransformconsists of FVector (Location), FRotator (Rotation) and FVector (Scale in 3-axis).FQuatanother variable that can specify a rotation also known by its full name as Quaternion, you will mostly use FRotator in game-code however, FQuat is less used outside the engine modules although it can prevent Gimbal lock. (It’s also not exposed to Blueprint)
TArray, TMap, TSet
Basically variations of lists of objects/values. Array is a simple list that you can add/remove items to and from. TMap are dictionaries, meaning they have Keys and Values (where the Key must always be unique) eg. TMap<int32, Actor> where a bunch of Actors are mapped to unique integers. And finally, TSet which is an optimized (hashed) version of TArray, requires items in the list to be unique. Can be great for certain performance scenarios, but typically you use TArray.
TSubclassOf<T>
Very useful for assigning classes that derive from a certain type. For example, you may expose this variable to Blueprint where a designer can assign which projectile class must be spawned.
UPROPERTY(EditAnywhere) // Expose to Blueprint
TSubclassOf<AProjectileActor> ProjectileClass; // The class to assign in Blueprint, eg. BP_MagicProjectile.
Now the designer will get a list of classes to assign that derive from ProjectileActor, making the code very dynamic and easy to change from Blueprint.
Here we use the TSubclassOf variable ProjectileClass to spawn a new instance: (link to code)
FTransform SpawnTM = FTransform(ProjRotation, HandLocation);
GetWorld()->SpawnActor<AActor>(ProjectileClass, SpawnTM, SpawnParams);
C++ MACROS (& Unreal Property System)
The ALL CAPS preprocessor directives are used by the compiler to ‘unfold’ into (large) pieces of code. In Unreal Engine, it’s most often used by the Unreal Property System and to add boilerplate code to our class headers. These examples are all macros, but Macros can be used for a lot more than shown below.
UFUNCTION
Allows extra markup on functions, and exposes it to the Property System (Reflection) of Unreal. Commonly used to expose functions to Blueprint. Sometimes required by the engine to bind functions to delegates (eg. binding a timer to call a function).
Here is additional information in a blog post on the available keywords within UFUNCTION() and how to use them. There are a lot of function specifiers worth checking out, and BenUI does a great job of detailing what’s available.
// Can be called by Blueprint
UFUNCTION(BlueprintCallable, Category = "Action")
bool IsRunning() const;

// Can be overriden by Blueprint to override/extend behavior but cannot be called by Blueprint (only C++)
UFUNCTION(BlueprintNativeEvent, Category = "Action")
void StartAction(AActor* Instigator);
UPROPERTY
Allows marking-up variables, and exposing them to the Property System (Reflection) of Unreal. Commonly used to expose your C++ to Blueprint but it can do a lot more using this large list of property specifiers. Again, it’s worth checking out Unreal Garden’s article on UPROPERTY specifiers.
// Expose to Blueprint and allow editing of its defaults and only grant read-only access in the node graphs.
UPROPERTY(EditDefaultsOnly, BlueprintReadOnly, Category = "UI")
TSoftObjectPtr<UTexture2D> Icon;

// Mark 'replicated' to be synchronized between client and server in multiplayer.
UPROPERTY(Replicated)
URogueActionComponent* ActionComp;
GENERATED_BODY
At the top of classes and structs and used by Unreal to add boilerplate code required by the engine.
GENERATED_BODY()
USTRUCT, UCLASS, UENUM
These macros are required when defining new classes, structs, and enums in Unreal Engine. When you create your new class, this is already added for you in the Header. By default, they will be empty like UCLASS() but can be used to add additional markup to an object for example
USTRUCT(BlueprintType)
struct FMyStruct
{
}
UE_LOG (Logging)
Macro to easily log information including a category (eg. LogAI, LogGame, LogEngine) and a severity (eg. Log, Warning, Error, or Verbose) and can be an incredibly valuable tool to verify your code by printing out some data while playing your game much like PrintString in Blueprint.
// The simple logging without additional info about the context
UE_LOG(LogAI, Log, TEXT("Just a simple log print"));
// Putting actual data and numbers here is a lot more useful though!
UE_LOG(LogAI, Warning, TEXT("X went wrong in Actor %s"), *GetName());
The above syntax may look a bit scary. The third parameter is a string we can fill with useful data, in the above case we print the name of the object so we know in which instance this happened. The asterisk (*) before GetName() is used to convert the return value to the correct type (from FString returned by the function to Char[] for the macro). The Unreal Wiki has a lot more detailed explanation on logging.
Modules
Unreal Engine consists of a large number (1000+) of individual modules. Your game code is contained in one or multiple modules. You can place your game-specific logic in one module, and your more generic framework logic for multiple games in another to keep a separation of dependencies.
You can find examples of these code modules in your engine installation folder (eg. Epic Games\UE_5.0\Engine\Source\Runtime\AIModule) where each module has its own [YourModuleName].build.cs file to configure itself and its dependencies.
Not every module is loaded by default. When programming in C++ you sometimes need to include additional modules to access their code. One such example is AIModule that you must add to the module’s *.build.cs file in which you wish to use it before being able to access any of the AI classes it contains.
PublicDependencyModuleNames.AddRange(new string[] { "Core", "CoreUObject", "Engine", "InputCore", "AIModule", "GameplayTasks", "UMG", "GameplayTags", "OnlineSubsystem", "DeveloperSettings" });
The above is one example from ActionRoguelike.build.cs where AIModule (among several others) has been added.
You can include additional modules through the .uproject as well instead of the build file. This is where the editor will automatically add modules under AdditionalDependencies when required (such as the moment of creating a new C++ class that derives from a missing module).
Ari from Epic Games has a great talk on Modules that I recommend checking out and is linked below. I’ve added a few takeaways from his talk.
Why use modules?
- Better code practices/encapsulation of functionality
- Re-use code easily between projects
- Only ship modules you use (eg. trim out Editor-only functionality and unused Unreal features)
- Faster compilation and linking times
- Better control of what gets loaded and when.
Ari from Epic Games has a great video on the subject of Modules in Unreal Engine.
Garbage Collection (Memory Management)
Unreal Engine has a built-in garbage collection that greatly reduces our need to manually manage object lifetime. You’ll still need to take some steps to ensure this goes smoothly, but it’s easier than you’d think. Garbage collection occurs every 60 seconds by default and will clean up all unreferenced objects.
When calling MyActor->DestroyActor(), the Actor will be removed from the world and prepared to be cleared from memory. To properly manage ‘reference counting’ and memory you should add UPROPERTY() to pointers in your C++. I’ll discuss that more in the section below.
It may take some time before GC kicks in and actually deletes the memory/object. You may run into this when using UMG and GetAllWidgetsOfClass. When removing a Widget from the Viewport, it will remain in memory and is still returned by that function until GC kicks in and has verified all references are cleared.
It’s important to be mindful of how many objects you are creating and deleting at runtime as Garbage Collection can easily eat up a large chunk of your frame time and cause stuttering during gameplay. There are concepts such as Object Pooling to consider.
Automatic Updating of References (Actors & ActorComponents)
References to Actors (and ActorComponents) can be automatically nulled after they get destroyed. For this to work you must mark the pointer with UPROPERTY() so it can be tracked properly.
// SInteractionComponent.h
UPROPERTY()
TObjectPtr<AActor> FocusedActor;
“Destroyed actors don’t have references to them nulled until they’re actually garbage collected. That’s what IsValid(yourobject) is used for checking.” - Ari Arnbjörnsson
You can read more about automatic updating of references on the official docs. The thing to keep in mind is that it only works for Actor and ActorComponent derived classes. In UE5 the behavior for automatically clearing RawPtrs / ObjectPtrs will change.
“This will be changing a bit in UE5. The GC will no longer clear UPROPERTY + RawPtr/TObjectPtr references (even for Actors) but instead mark them as garbage (MarkAsGarbage()) and not GC them. The only way to clear the memory will be to null the reference or use weak pointers.” - Ari Arnbjörnsson.
TWeakObjPtr<T>
Weak Object Pointer. This is similar to pointers like UObject*, except that we tell the engine that we don’t want to hold onto the memory or object if we are the last piece of code referencing it. UObjects are automatically destroyed and garbage collected when no code is holding a (hard) reference to it. Use weak object pointers carefully to ensure objects are GC’ed when needed.
// UGameAbility derived from UObject
TWeakObjectPtr<UGameAbility> MyReferencedAbility;
Now we don’t try to hold onto the object explicitly and it can be garbage collected safely. Before accessing the object, we must call .Get() which will attempt to retrieve the object from the internal object array and makes sure it’s valid. If it’s no longer a valid object, a nullptr is returned instead.
UGameAbility* Ability = MyReferencedAbility.Get();
if (Ability)
{
}
- Documentation on WeakObjPtr<T>
- Soft & Weak Object Pointers (Ari Arnbjörnsson)
- Even more technical, on Smart Pointers in Unreal
Class Default Object
Class Default Object is the default instance of a class in Unreal Engine. This instance is automatically created and used to quickly instantiate new instances. You can use this CDO in other ways too to avoid having to manually create and maintain an instance.
You can easily get the CDO in C++ via GetDefault<T>. You should take care to not accidentally make changes to the CDO as this will bleed over into any new instance created for that class.
Below is one example from SaveGameSubsystem using the ‘class default object’ to access DeveloperSettings (Which can contain Project & Editor Settings to access in your game code) without first creating a new instance.
// Example from: SSaveGameSubsystem.cpp (in Initialize())

const URogueSaveGameSettings* Settings = GetDefault<URogueSaveGameSettings>();

// Access default value from class
CurrentSlotName = Settings->SaveSlotName;
Asserts (Debugging)
If you really need to be sure if something is not nullptr or a specific (if-)statement is true and want the code to tell you if it isn’t, then you can use Asserts. Asserts are great as additional checks in code where if it were to silently fail, code later down the line may fail too (which may then take a while to debug and find the origin).
Two common assertion types are check and ensure.
check(MyValue == 1); // treated as fatal error if statement is 'false'
check(MyActorPointer);

// convenient to break here when the pointer is nullptr we should investigate immediately
if (ensure(MyActorPointer)) // non-fatal, execution is allowed to continue, useful to encapsulate in if-statements
{
}
ensure() assert is great for non-fatal errors and is only triggered once per session. You can use ensureAlways() to allow the assert to trigger multiple times per session. But make sure the assert isn’t in a high-frequency code path for your own sake or you’ll be flooded with error reports.
It’s good to know that Asserts are compiled out of shipping builds by default and so it won’t negatively affect runtime performance for your end-user.
By adding these asserts you are immediately notified of the (coding) error. One tip I would give here is to only use it for potential coder mistakes and perhaps don’t use it when a piece of content isn’t assigned by a designer (having them run into asserts isn’t as useful as to them it will look like a crash (unless they have an IDE attached) or stall the editor for a bit (as a minidump is created) and not provide a valuable piece of information). For them might be better of using logs and prints on the screen to tell them what they did not set up properly. I sometimes still add in asserts for content mistakes as this is very useful in solo or small team projects.
Core Redirects
Core Redirects are a refactoring tool. They let you redirect pretty much any class, function, name, etc. after your C++ has changed via the configuration files (.ini). This can be incredibly helpful in reducing the massive headache of updating your Blueprints after a C++ change.
The official documentation (above) does a pretty good job of explaining how to set this up. It’s one of those things that’s good to know before you need it. Modern IDEs with proper Unreal Engine support such as JetBrains Rider even have support for creating these redirects when you refactor your Blueprint exposed C++ code.
Closing
I hope this article provided you with some new insight into C++ and how it’s used in Unreal Engine. This article has mainly focused on the uncommon aspects that are unique to Unreal Engine and how they apply within that context rather than C++ or programming in general.
Why stop here? Dive deeper into the world of C++ and Unreal Engine with my industry proven course! Used by thousands of Indie & AAA developers around the world!
As always, follow me on Twitter/X for more Unreal Engine insights!
On The Horizon…
Things that didn’t quite make it in yet or require a more detailed explanation in the current sections. Leave your suggestions in the comments!
- Unreal Header Tool / Unreal Build Tool (”Unreal Build System”)
- Project Structure (Game, Engine, build.cs, Target, binaries, .uproject)
- Including other classes (and how to find their path)
- Hot Reloading & Live Coding in UE5.0
- IDE recommendations and setup
- Timers, Async actions (Latent), Multi-threading
- Game Class Hierarchy and most commonly used classes (primer).
- virtual/override keywords. (”Virtual Functions and Polymorphism”)
- ‘const’ keyword & const correctness
- Operator Overloading (examples of where Unreal has done so, eg. with FString when used with logging)


