Getting Started with VR in Unreal Engine
This guide is for anyone who is looking to get into developing for Virtual Reality projects in Unreal Engine. Covering Blueprint, C++, performance considerations and how to set up your VR kits for UE4.
A few good places to reference are the official VR documentation pages and the Unreal Engine VR Subforums.
Unreal Engine now has a built-in VR Template made in Blueprint. For more information check out my VR Template Guide!
Setup your VR Device
For this guide I will assume you have successfully installed your head-mounted display of choice (Visit Oculus Rift Setup or HTC Vive Pre Setup in case you did not). In case you are having difficulties getting your Vive to work, I found this Troubleshooting guide to be helpful.
Unreal Engine 4 supports all the major devices and you don’t need to perform any hassle to setup your game project for VR. Just make sure that the correct plugins are loaded for your HMD under Edit > Plugins. There are some performance considerations to take into account, we’re covering these later in the guide.

Before you launch the editor make sure your VR software is running, in the case of the HTC Vive this is the SteamVR app.
Launching VR Preview
Testing out your VR set is very straightforward, simply select “VR Preview” from the Play drop-down button. By default the head tracking will work right away without any changes to your existing project or template. I will go into more detail on how to add additional features such as motion controller setup and origin resetting etc. later on in this guide.

VR Best Practices
VR is still a relatively unexplored area, and we are learning new things with every day of development. Both Oculus and Epic Games have set up a Best Practices Guide that I recommend you read through and keep in the back of your head while developing games for VR.
Using VR in Blueprint
Using VR in Blueprint is very straightforward and you don’t need a lot of set up to get yourself going.
You will need a Camera Component and optionally one or two Motion Controllers Components. By default your Camera is already set up for HMD support, if you wish to disable rotation changes from the HMD you can disable “Lock to HMD” in the Component’s properties. For more information on the Motion Controllers you can jump down in this guide or immediately jump to the official documentation page on how to Setup Motion Controllers.
Here is a (non-exhaustive list) of the available nodes in Blueprint:

To reset your HMD position and/or orientation (With optional Yaw offset):

To selectively enable features when using VR you can easily check whether your HMD is enabled:

SteamVR Chaperone
The Chaperone component is specific to SteamVR and has easy access to the soft bounds. The soft bounds are represented as an array of Vectors centered around the calibrated HMD’s Origin (0,0,0). The Z component of the Vectors is always zero. You can add this component like any other ActorComponent to your Blueprint as seen below.

USteamVRChaperoneComponent
To use the chaperone in C++ open up your ProjectName.Build.cs and add the “SteamVR” module to the PrivateDependencyModuleNames array. See below for a sample.
using UnrealBuildTool;

public class VRFirstPerson : ModuleRules
{
	public VRFirstPerson(TargetInfo Target)
	{
		PublicDependencyModuleNames.AddRange(new string[] { "Core", "CoreUObject", "Engine", "InputCore" });

        /* VR Required Modules */
		PrivateDependencyModuleNames.AddRange(new string[] { "HeadMountedDisplay" , "SteamVR" });
	}
}
Setup Motion Controllers
The official documentation has a good introduction on Motion Controller setup and input handling, so if your VR Device supports motion controllers I recommend following along with the documentation. For a practical example check out my VR Templates on GitHub.
If you’re having trouble aligning your Motion Controllers with the Camera, simply use a SceneComponent as “VROrigin”, this is especially helpful when the root component has an undesirable pivot like the CapsuleComponent in a Character Blueprint.

Using VR in C++
As of 4.11 not all functionality is exposed to Blueprint, if you are looking to do more advanced custom setups you might need to dig into C++ to adjust a few settings. Check out the IHeadMountedDisplay.h for a look at the available functions. Certain plugins add additional features like SteamVRChaperoneComponent but are specific to a single device.
Required Modules & Includes
If you wish to access the HMD features through C++ you need to include the “HeadMountedDisplay” Module in your ProjectName.Build.cs file you can find in your Visual Studio solution explorer. Here is an example of the build file from the VRFirstPerson project.
using UnrealBuildTool;

public class VRFirstPerson : ModuleRules
{
	public VRFirstPerson(TargetInfo Target)
	{
		PublicDependencyModuleNames.AddRange(new string[] { "Core", "CoreUObject", "Engine", "InputCore" });

        /* VR Module */
		PrivateDependencyModuleNames.AddRange(new string[] { "HeadMountedDisplay" });

		// ...
	}
}
To use HMD features or the motion controller component, make sure you include the following header files.
/* VR Includes */
#include "HeadMountedDisplay.h"
#include "MotionControllerComponent.h"
Performance Considerations
For the whole VR experience to look smooth, your game needs to run on 75 hz (Oculus DK2) or even 90 hz. (HTC Vive and Oculus CV1) depending on your device. To see your current framerate type in “stat fps” or “stat unit” (for more detailed breakdown) in your console when running the game.
CPU Profiling
Your game might be CPU or GPU bound, to find out you need to measure (a quick way is to use “stat unit”). With the complexity of current gen games and engines it’s near impossible to make good guesses on what’s bottlenecking your performance so use the tools at your disposal! Bob Tellez wrote a blog post on CPU Profiling with Unreal Engine 4 and it’s a good place to get started.
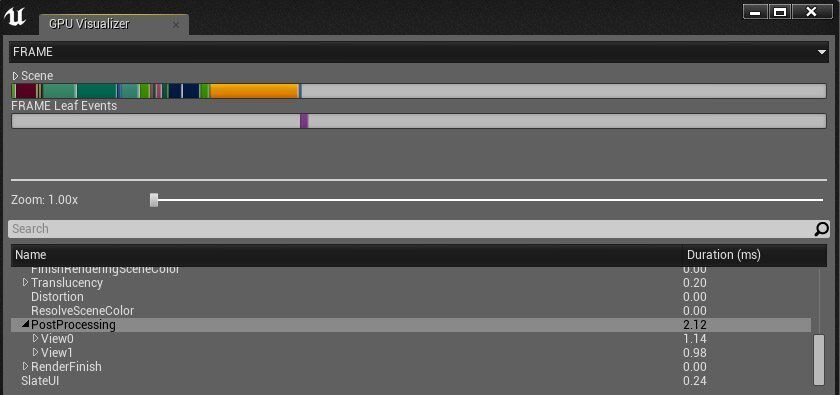
GPU Profiling
To capture a single frame with GPU timings press Ctrl+Shift+, or type in “profilegpu” in the console. This command dumps accurate timings of the GPU, you will find that certain processes are a heavy burden on the framerate (Ambient Occlusion is one common example) when using VR.
The GPU Profiling & Performance and Profiling docs are a good place to learn about profiling your game.
While profiling you might stumble on other costly features depending on your scene and project. One example is the Translucent Lighting Volume you may not need but even when unused it adds a static cost to your scene, check out this AnswerHub post by Daniel Wright for more info on how to disable this feature. All that is left for you to do is measure and test, there is no single configuration that is perfect for all projects.
The developers from FATED came up with a great list of tips in their quest for optimized VR. A few examples they mention are to disable HZB Occlusion Culling (r.HZBOcclusion 0), Motion Blur (r.DefaultFeature.MotionBlur=False) and Lens Flares (r.DefaultFeature.LensFlare=False). The commands do not persist through multiple sessions, so you should add (or search and replace) them in your /Config/DefaultEngine.ini config file although most of these settings are available through Edit > Project Settings… > Rendering.
Another great optimization to consider is the Instanced Stereo Rendering, we’ll talk about that next.
Instanced Stereo Rendering
The latest 4.11 release introduces Instanced Stereo Rendering, check the video below for a comparison video of how that works.
“Basically, we’re utilizing hardware instancing to draw both eyes simultaneously with a single draw call and pass through the render loop. This cuts down render thread CPU time significantly and also improves GPU performance. Bullet Train was seeing ~15 – 20% CPU improvement on the render thread and ~7 – 10% improvement on the GPU.” – Ryan Vance.
To enable this feature in 4.11 and above, go to your Project Settings and look for “Instanced Stereo” under the Rendering category.

Disable Heavy Post-Processors
Certain post-processing effects are very costly in VR like Ambient Occlusion. Others may even become an annoyance in VR like Lens Flares as they may break your immersion of being present in the scene and instead looking through a camera. These are easy examples to get started and see how it affects your game and performance.
To disable post processing features on a project level, go to Edit > Project Settings > Rendering. You can do the same thing in post-processing volumes. Keep in mind that post-processing volumes can override the project-wide settings specified below.

Reduce Scene Complexity
With current gen hardware it’s really difficult to stay on your 90 fps target. You may need to revisit your previous traditional constraints and look at your scene complexity like dynamic shadows, atmospheric smoke effects and polycount of meshes.
It’s important to minimize overdraw to keep performance at a maximum. Lots of translucent surfaces and/or particle effects can easily cause your framerate to tank. To visualize the current shader complexity / overdraw press Alt+8 in your viewport (Alt+4 to return to default view). Look at the bottom picture from the Elemental Demo to get an idea of how much the atmospheric effects can impact your framerate (green = good, red = bad, white hot = extremely bad at about 2000 shader instructions per pixel)
Dynamic shadows and lights have a huge impact on performance too. Bake as much lighting as you can to keep the per-frame cost as low as possible.

List of Rendering Commands
The excellent talk by Nick Whiting and Nick Donaldson contains a list of render commands to use for GPU optimization in VR. You can find the list below. I recommend watching their talk regardless as it contains great info on the basics of Virtual Reality in general.
To test out these commands hit ~ (Tilde) to open the command console. Once you settled on a command to be included for your project, you can add them to your configuration in /Config/DefaultEngine.ini under [/Script/Engine.RendererSettings]. Tip: Check if the command exists in the list before adding it yourself.
- r.SeparateTranslucency=0
- r.HZBOcclusion=0
- r.FinishCurrentFrame=1
- r.MotionBlurQuality=0
- r.PostProcessAAQuality=3
- r.BloomQuality=1
- r.EyeAdaptionQuality=0
- r.AmbientOcclusionLevels=0
- r.DepthOfFieldQuality=0
- r.SceneColorFormat=2
- r.TranslucentLightingVolume 0
- r.TranslucencyVolumeBlur=0
- r.TranslucencyLightingVolumeDim=4
- r.MaxAnisotropy=8
- r.LensFlareQuality=0
- r.SceneColorFringeQuality=0
- r.FastBlurThreshold=0
- r.SSR.MaxRoughness=0
- r.SSR.Quality=0
- r.rhicmdbypass=0
- r.TiledReflectionEnvironmentMinimumCount=10
Troubleshooting
Vive Specific (Non-PRE editions): Once you launched the editor, SteamVR may state “Not Ready” this means something may be overlapping and preventing the Compositor screen to run at more than 60 FPS causing jittering and motion sickness. More information and workaround for this issue can be found on this AnswerHub Thread! The next iteration of Vive devices (Vive PRE) no longer have this issue as they moved to direct mode for the displays, for this make sure you updated your graphics drivers to support direct mode.

References
- Official Documentation Main Page
- VR Cheat Sheet
- Unreal Engine VR Subforums
- Unreal Engine VR Playlist
- FATED and the quest for optimized VR
- The Vanishing of Milliseconds: Optimizing the UE4 renderer for Ethan Carter VR (Gamasutra)
Hopefully this guide has helped you get started with Virtual Reality project!
If you have a question or feel that I missed something important, let me know by leaving a reply below! To stay in touch, follow me on Twitter!


Oh my god. Tom Looman. I do not know who you are, but boy am I happy you exist. Thanks so much for this! Really helped me figure out the most *annoying* compiler error due to not having ` PrivateDependencyModuleNames.AddRange(new string[] { “HeadMountedDisplay” });` in my build.cs file.
Muchas gracias, senor
I absolutely hate doing this kind of comment, but I’m truly in a bind in regards to getting my headset (HTC Vive) to be recognized by Unreal Engine 4.21 (VR Preview is grayed out). The headset is fully functional outside of Unreal, in that I did the room setup and see the blank gray grid. As for Unreal I have tried a blank template, blank template + adding the VR package, the VR template, restarting my machine, starting with SteamVR booted before starting Unreal (and vice versa), everything I can think of. Does anyone have any advice for me? I’m downloading 4.16 in hopes that will make a difference, but I’m not optimistic that will matter.
Update for anyone wondering: 4.16 worked for me. I’m downloading 4.22 now to see if it was an isolated issue or a chronological issue.
What is the maximum sized (single) map UE4 supports for a VR multiplayer? I know the updated max for a regular (non-VR) multiplayer is supposed to be 20,000 x 20,000 units. But has anyone tested this out with VR? Have played around with smaller games, but now want to move on to an open world multiplayer exploration game (not massive, just small groups).
I am trying to integrate this with another blueprint that has a wider grip range and more hand animations. However I love the teleportation in your system. However I cant seem to get them to work together. Would it be easier to just build a new blueprint to combine them together vs trying to integrate your teleport system into the other system? I have only been using UE4 for about 6 months now so I could be missing something.
Hi, I have a problem, when I use the htc vive the lenses don’t display the same image, the left shows the image very left and the right more to center.
I hope you can help me
Hi, how can the teleporter marker size be changed? I can’t fit through some door ways with the default size.
Thank so much for your efforts.
That size is based on the navigation mesh settings (normally used for AI) the docs are terribly expansive on this topic unfortunately, but you might want to look at changing “Agent Width” or size. or reduce the padding between the navigation and geometry (these settings are either in the Project Settings, navigation/AI or in the navigation volume added to the level. Hope that points you in the right direction!
– Tom
I have one question:
Can i use only stereo preview (For example – https://vr.google.com/cardboard/ Low cost ) and keep mouse and keyboard controllers ?
hello,i am a chinese colleage student,i want to translate your essay into chinese and upload it to tencent to publish it.the provenance will be addressed.can you allow me?
Hi mate,
Just please make sure it’s freely available when translated (and not locked behind a paywall) in that case that would be neat!
– Tom
Hello. I have a problem with HTC Vive and DFAO. I see shadows from sky(movable) in viewport but its lost in HTC. Anyone help me?
Hello Tom,
I am New to the Unreal, i have watched some tutorials on the Unreal engine,and trying to develop with the help of leapmotion. In my case the VR Preview is grey in my unreal tools, i know that we should have HTC vive, but it takes a couple of weeks for shipping mean while is there any other option that we can preview .
VR Preview is not like an emulator (like the preview for mobile devices) it only works when you have a VR device.
You can simply use LeapMotion without the VR element, there isn’t much difference in developing/previewing your mechanics and not a lot you can emulate till you receive you Vive I’m afraid.
– Tom
Hi Tom!
Thanks for your contributions! I’m very grateful (and surely a lot of unreal developers)
I’m trying to do something for VR (just for learning) and when I use VR preview editor everything is ok but my it does not work in a standalone game.
I have added this code to SetupVROptions with no success:
IHeadMountedDisplay* HMD = (IHeadMountedDisplay*)(GEngine->HMDDevice.Get());
if (HMD)
{
HMD->EnableHMD(true);
}
How can I enable my HMD for a package project / standalone game??
Regards
Make sure to start the exe with the “-fullscreen” command switch. 🙂
Hi jonathan, I’m going to try. Thanks!
In my c++ file,I add UPROPERTY()
class USteamVRChaperoneComponent *SteamVRCcom,
but I get this Unrecognized type: USteamVRChaperoneComponent.
I include”Engine/Plugins/Runtime/Steam/SteamVR/Source/SteamVR/Classes/SteamVRChaperoneComponent.h” in my cpp,
why isn’t work?
Hi mate can you try the following:
– Add the include to your header instead.
– Add ‘class’ infront of your USteamVRChaperoneComponent* SteamVRCcom
I’ve added a section to the guide to explain how to use this component (since it’s part of a plugin, you need to include the SteamVR module)
https://www.tomlooman.com/getting-started-with-vr/#USteamVRChaperoneComponent
Also… me again 😛 I’ve just tried rebuilding from source in VS 2013 and got error messages in the logs. Can’t seem to build the .dll still.
You can no longer use VS 2013 to build these projects, anything 4.10+ required VS 2015.
– Tom
Hey Tom, Thanks for these examples. Working great for the vehicle demo but VRFirstPerson won’t load. Getting the error “The following modules are missing or built with a different engine version… UE4Editor-VRFirstPerson.dll… would you like to rebuild them now”. When I try to rebuild to 4.11.1 it fails and suggests I rebuild from source. Do you know if there is a work around?
Many thanks,
Louisa
Hey thanks so much for this!
One question, When I start this up it doesn’t start at ground level and looks a little wonky when trying to walk around. is there anything I can do to fix this?
I bet you are using the Vive? Try Ctrl+R or look in Blueprint Reset Position and Orientation as listed above. (http://i1.wp.com/www.tomlooman.com/wp-content/uploads/2016/01/ResetVRNode.jpg) Should use 4.11 and above for this though.
That should work, otherwise you may need to set Base Eye Height to 0 in your Character blueprint.
Hope that works,
Tom
Tom, I have a Oculus DK2 and don’t have hand motion controllers. I just have a microsoft gamepad (xbox). So I’m looking at third person view. In that position, even though I have my VR legs, after 15 – 20 mins I start to get motion sick. So I’m trying to figure out a way to ground the player. I did get the space ship from Epics Features Tour 2014 project and attached it to the camera boom for testing. I had to move it into position to get the camera in the center. It helped a lot, but when you move to another level (not level streaming) the ship moved from location and looked weird. I did try to attach the camera to the ship but then I couldn’t move the camera boom around with the right thumb stick.
I have seen Lucky’s tale and the way the camera motion is set up in that. how would be the best way to implement that type of camera movement but also having something there to plant the player, as I’ve heard some people are getting motion sickness because the camera is in the air with nothing to help ground them in a seated position.
my project is using the MMO starter Kit. so needs to be multi player friendly (render client only)
Hey Tom, thanks for the guide and templates!
I’m having trouble using the first person template with the Vive. You float maybe a foot off the ground and I cannot for the life of me figure out why. I’ve tried making my own VR template with 4.9 and 4.11 but I always end up floating above the ground. Please tell me you know why!
A few things that helped for me is to use a SceneComponent that I attach the CameraComponent to so the positioning doesn’t get messed up with Character classes. The root component for Characters is a CapsuleComponent, which has a center pivot about halfway up the character.
For a few examples check out this repo I was working on https://github.com/tomlooman/VRTemplates
Hey Tom awesome info here!
I am testing the Render commands, but where do I need to place them? and how can I see if they work?
At the moment I have placed them in the Game/Saved/Config/Windows/Scalability.ini. The render commands are clear for me but how and where to put the .ini files and in which one is pretty unclear. also are the .ini files packaged in the cooking process? And how can I test that? Thanks!
You can test them in a running game instance by using the command console (~ Tilde key) Once you tested a command you can add it to ./Config/DefaultEngine.ini you’ll see many other r.* commands (see if the command already exists and update, or add it to the list)
You don’t add them to /Saved/ because these are NOT part of your game builds, that’s your local cache only.
– Tom
Hey Tom, thanks for this info.
I tried this in my project and with those particular settings “List of Rendering Commands” i get some very odd behavior with my lighting.
Looks like an issue with the skylight not working at all perhaps. If i click “unlit” in the editor, my whole scene appears black.
I went through each setting and couldn’t figure out what one it was, have you seen this before? Perhaps i have some incorrect settings somewhere.
Thanks 🙂
Sorry about that, seems to not be an issue with these settings, but an issues with setting a static cube map in 4.11, skylight with captured cube doesn’t exhibit this behavior. doh.
Glad you figured it out though!
– Tom
This is really really helpful.Thank you so much!
Hi Tom,
is there any more detailed description for how to get the motioncontroller component to work with multiplayer?
I’m not having much luck.
There has been a bug reported with motion controllers in multiplayer. The fix should make it into the next release (4.11)
That would be really great if they can fix it! Wes said this so hopefully someone is having another look at it,
“”You have run into the same hurdle we have regarding multiplayer with motion controllers. Our team has indicated that a code side fix for this is in the 4.11 preview build however after testing, I’m still unable to get this to work properly myself. “
Happy to know you are dealing with VR in unreal now, you had gained my respect since you posted the inventory system, I learned too much with that. Thanks!
Thanks mate, you’re welcome!
The first person template in 4.11 doesn’t work out of the box with my DK2. I’m in some sort of crouch level position (unless I untick Lock to HMD). But most importantly, the tracking is “locked”, that is when I move the oculus, the camera only move a bit. The tracking in itself seems to work but it is as if the camera was locked
I’ll be submitting a bunch of improvements to these in the next few days. The positional tracking is disabled through code in VRCharacter.cpp, look for bPositionalHeadTracking = false;
I see that this could at the same time mess with the origin if you look inside ResetHMDOrigin() in the same class! Fixes coming soon 🙂
– Tom
bit of a noob when it comes to this, sorry… 🙂 where do I look for this bPositionalHeadTracking? can’t seem to stumble upon it.
thanks Tom
– Alan
No problem! That is something I did custom in the template: https://github.com/tomlooman/VRTemplates/blob/master/VRFirstPerson/Source/VRFirstPerson/VRCharacter.cpp
Disabled positional headtracking by default in the constructor.
– Tom
Really looking forward to the imporovements, keep up the good work!
Hey Tom,
You should do a Getting Started with AR in UE4! Especially now with Project Tango is available.
I don’t own any AR devices, but could be a fun side project for the future!
– Tom
Project Tango look awesome.
After an hour of testing, with our current project converted to 4.11 aswell as the default FirstPerson, I am not able to get stereo rendering (Vive) when using VR Preview. It launches as a regular standalone. Console command “stereo on” doesn’t work either. I’ve tried with and without SteamVR running (It used to work either way). Instanced stereo rendering on/off doesn’t matter, and everything works well on 4.10.1. Any ideas?
As of 4.11 the console commands aren’t hooked up for the Vive. None of the stereo commands worked for me either.
I am running on 4.11 with the Vive. not sure what’s happened on your end. First thing to check is your loaded plugins and perhaps the log window is able to tell you more in case there is a load error or something.
– Tom
I didn’t know about the improvements for stereo rendering in 4.11! It’s amazing to see Epic doing groundbreaking work and immediately sharing it. Makes it possible to actually create great games without 10 years of experience. Thanks for a great post!